Draw arrows with GIMP plugins
 |
| Sample arrows that you can create with GIMP plugins |
If you want to create professionally-looking arrows with GIMP because you are tired of creating arrows that look like you drawn them drunk, then don't despair. I will show you three GIMP plugins for creating great-looking arrows:
- ArrowsCreator-0.4 is a Python plugin that supports 7 styles of arrows
- arrow.scm by B-Ranger is a script-fu plugin to "draw an arbitrary arrow into an image or a new layer"
- arrow.scm by programmer_ceds is a modified version of the previous script that allows you to draw curved arrows
ArrowsCreator-04
Here are the steps to install the Python plugin ArrowsCreator-04:
- Download the zip file ArrowsCreator-0.4.py.zip, and extract the two files ArrowsCreator-0.4.py and ArrowsModule.py
- Copy the two Python files into the plugins folder which on macOS is located at
/Applications/GIMP.app/Contents/Resources/lib/gimp/2.0/plug-insFor other platforms, check out this guide on how to install GIMP plugins, or you can also find out the location of the plugins folder by clicking on GIMP > Preferences, and then on the left panel, search for Folders > Plug-Ins.

- Start GIMP, and you should have an ArrowsCreator configuration window pop-up that allows you to re-name the newly installed extension that will now show up in the menu at Extensions > Plugins-Python > Tools.


- Load an image, and choose the Paths Tool from the Toolbox window

Test image

- Choose a foreground color. This will be the color of the arrow.

- Select the ArrowsCreator plugin from the menu at Extensions > Plugins-Python > Tools. A new window will open that will allow you to configure the arrow parameters such as the arrowing size, angle, and brush size.

- On the image, click anywhere where you want the arrow tail to be and then click again anywhere where you want the arrow head to be. Automatically, the arrow will be drawn on the image.

- If you modify the anchor points from step 4, click on Redraw the above arrow.


arrow.scm: draw straight arrows by B-Ranger
Here are the steps to install the plugin arrow.scm:

- Download the file arrow.scm
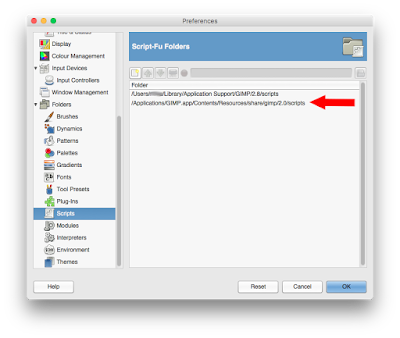
- Copy the file into the scripts folder which on macOS is located at
/Applications/GIMP.app/Contents/Resources/share/gimp/2.0/scriptsFor other platforms, check out this guide on how to install GIMP plugins, or you can also find out the location of the scripts folder by clicking on GIMP > Preferences, and then on the left panel, search for Folders > Scripts.
- Start GIMP, and the newly installed plugin should be accessed through Tools > Arrow...


- Load an image, and choose the Paths Tool from the Toolbox window
Test image
- Choose a foreground color. This will be the color of the arrow.

- Select the arrow.scm plugin from the menu at Tools > Arrow... A new window will open that will allow you to configure the arrow parameters such as the length of wings, angle between arrow and wing, and brush thickness.

- On the image, click anywhere where you want the arrow head to be and then click again anywhere where you want the arrow tail to be. When you are ready to draw the arrow, click on OK.
NOTE: if you want to use the first anchor as the arrow tail like ArrowsCreator does, then uncheck the box beside "Use first path point as arrow head?" in the Script-fu: Arrow window.
arrow.scm: draw curved or straight arrows by programmer_ceds
This is a modified version of the previous script that allows you to draw curved arrows. Download this modified script from here.
To install it, follow the same steps for installing the previous script.
Also, follow the same steps for drawing arrows as the previous script, but now after placing the anchors for the head and tail of the arrow (see step 4), you can now bend the path by Clicking+Dragging the path:
To install it, follow the same steps for installing the previous script.
Also, follow the same steps for drawing arrows as the previous script, but now after placing the anchors for the head and tail of the arrow (see step 4), you can now bend the path by Clicking+Dragging the path:


Okay, call me a moron if you like, but this says:
ReplyDeleteCopy the file into the scripts folder which on macOS is located at /Applications/GIMP.app/Contents/Resources/lib/gimp/2.0/plug-ins
Isn't "/Applications/GIMP.app" a file, not a folder? How can it have sub-folders?
Someone, please improve upon my apparent ignorance.
OMG! Curiousity got the better of me. I mean, surely I must be overlooking something. If I double click on GIMP.app it start Gimp, right?
ReplyDeleteUntil now, it never occurred to me that it might be an EXECUTABLE TOP LEVEL FOLDER. (I've only been using Macs for a year, after a decade of Linux.)
Anyway, I right clicked on GIMP.app, looking for clues, and there it was: SHOW PACKAGE CONTENTS!
I feel like I dug in the back of the closet and found a secret passage to the Magic Kingdom.
How could I have not stumbled across this sooner?
Signed, humbly,
A. Moron.
Sigh. Though my satisfaction with the discovery of executable top level folders remains untempered, still no Tools > Arrow, though according to my Gimp Preferences, the arrow.scm file is in the right folder.
ReplyDeleteWho would ever have thought it would be so #$%^& hard to draw a simple arrow with an image editor?
Hi. These are some of the steps you can try to troubleshoot the arrow.scm script to work:
Delete1. Make sure the arrow.scm script is in the right folder. arrow.scm should be in the ".../scripts/" folder, not the ".../plug-ins/" folder. To find the scripts folder go to Gimp → Preferences: Folders → Scripts. Two paths should be shown, one path for System-wide scripts (in /Applications/...) and the other path for user-private scripts (in $HOME/Library/...). Test with adding the script in each scripts folder.
2. After you have added the script in its folder, if you have GIMP already running, restart it so that it is aware of all the new scripts you have installed
3. Do a refresh by using Filters → Script-Fu → Refresh Scripts from the image menubar. The script will now appear in one of your menus. If you don't find it, look for it under the root file menu filters (or from image menubar search with Help → Plug-in Browser)
4. When testing the script, open an image, and you should see the Arrow option under the Tools menu. If no image is opened, the Arrow option is shown but is disabled
References:
- https://en.wikibooks.org/wiki/GIMP/Installing_Plugins
- https://docs.gimp.org/en/install-script-fu.html
- https://gimpchat.com/viewtopic.php?f=8&t=15144#p209535
- https://alvinalexander.com/design/gimp-how-to-install-script-fu-scripts-gimp-mac-osx