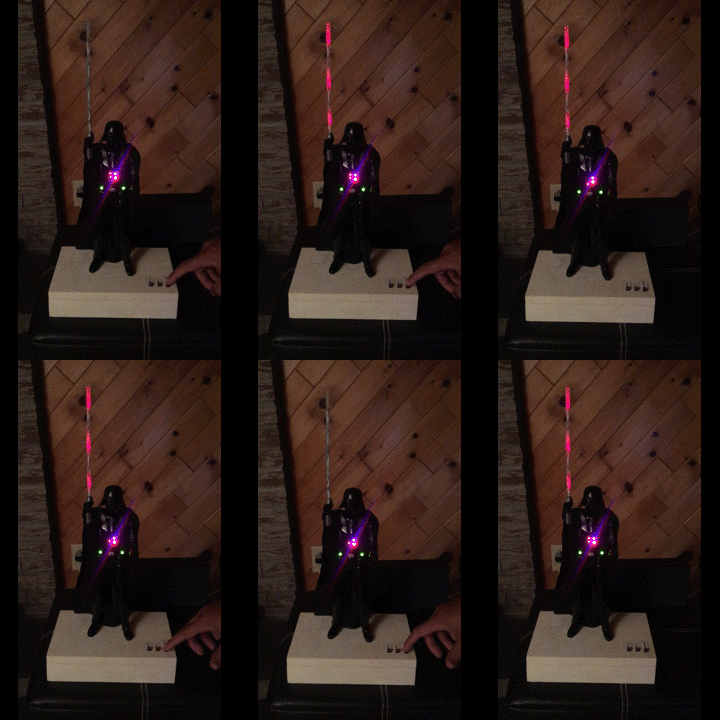
A Raspberry Pi project about activating Darth Vader with LEDs and sounds
Darth-Vader-RPi is a Python-based Raspberry Pi (RPi) project about activating a Darth Vader action figure by turning on LEDs on his suit and lightsaber, and by playing sounds such as some of his famous quotes.
The Darth Vader action figure is 11.5 inches tall (which is this one from Hasbro) and was modified to make it more lifelike by illuminating the lightsaber, chest control box, and belt. 3 push buttons control the following sounds and LEDs:
- Some of his famous quotes
- The Imperial march theme song
- The lightsaber opening and retraction sounds
- The lightbsaber illumination (3 LEDs)
His iconic breathing sound plays in the background indefinitely as soon as the RPi is run with the start_dv script.
Connection diagram
Here’s how the various LEDs and push buttons are connected to the Raspberry Pi:
- The lightsaber is illuminated by 3 LEDs connected in parallel.
- The Top, Middle, and Bottom LEDs illuminate the slots in Darth Vader's chest control box. They blink in a specific sequence.
- When the Lightsaber button is first pressed, it produces the drawing sound, illuminates the sword, and a hum sound persists until the Lightsaber button is turned off. If the button is pressed again, it produces the sound of retracting the lightsaber and turns it off.
- The Song button plays the Imperial March song by Jacob Townsend.
- The Quotes button plays famous Darth Vader quotes when pressed. For testing purposes, the darth_vader_rpi package comes with two movie lines:
- "I am your father" (YouTube)
- "Nooooo" (YouTube): it is also used for the closing sound when the start_dv script exits
Dependencies
- Platforms: Linux, macOS
- Python: 3.5, 3.6, 3.7, 3.8
- Packages:
- dv_sounds >=0.1.0a0: for retrieving the sound files (quotes, songs, and sound effects)
- pygame >=1.9.3: for playing sounds
- pynput >=1.6.8: needed by SimulRPi for monitoring the keyboard when simulating push buttons with keyboard keys, i.e. when running the start_dv script in simulation mode
- SimulRPi >=0.1.0a0: for partly faking RPI.GPIO and simulating I/O devices connected to an RPi such as LEDs and push buttons in case that you don't have access to an RPi
Installation instructions
- It is highly recommended to install darth_vader_rpi in a virtual environment using for example venv or conda.
Install the darth_vader_rpi package (released version 0.1.0a0) withpip:$ pip install git+https://github.com/raul23/Darth-Vader-RPi@v0.1.0a0#egg=Darth-Vader-RPi - Test your installation by importing darth_vader_rpi and printing its version:
$ python -c "import darth_vader_rpi; print(darth_vader_rpi.__version__)"
Script start_dv
Once the darth_vader_rpi package is installed, you should have access to the start_dv script which turns on LEDs and plays sound effects on a Raspberry Pi (RPi).
Run the script on your RPi with default values for the GPIO channels and other settings:$ run_examples
$ run_examples -s
$ run_examples -h
Here is a video of what it looks like in a terminal when running the start_dv script on a computer instead of an RPi:
Resources
References
- dv_sounds: a package for downloading the various sounds needed for the project, e.g. ligthsaber sound effects.
- pygame: a Python library to write multimedia software, such as games, built on top of the SDL library.
- RPI.GPIO: a module to control RPi GPIO channels.
- SimulRPi: a package that partly fakes RPi.GPIO and simulates some I/O devices on a Raspberry Pi. It makes use of the pynput library for monitoring the keyboard for any pressed key.
Song credit
Imperial March song by Jacob Townsend is licensed under a Creative Commons (CC BY-NC-SA 3.0) License
NOTE: The original song file was reduced under 1 MB by removing the first 7 seconds (no sound) and the last 2 minutes and 24 seconds.


![LEDs and buttons simulation in a terminal [Darth-Vader-RPi project]](https://img.youtube.com/vi/NwVQlh5eu1g/0.jpg)


Comments
Post a Comment