Posts

A Raspberry Pi project about activating Darth Vader with LEDs and sounds

Image
Darth-Vader-RPi is a Python-based Raspberry Pi (RPi) project about activating a Darth Vader action figure by turning on LEDs on his suit and lightsaber, and by playing sounds such as some of his famous quotes. Click on the gif to play the video The Darth Vader action figure is 11.5 inches tall (which is this one from Hasbro ) and was modified to make it more lifelike by illuminating the lightsaber, chest control box, and belt. 3 push buttons control the following sounds and LEDs: Some of his famous quotes The Imperial march theme song The lightsaber opening and retraction sounds The lightbsaber illumination (3 LEDs) His iconic breathing sound plays in the background indefinitely as soon as the RPi is run with the start_dv   script. Connection diagram Here’s how the various LEDs and push buttons are connected to the Raspberry Pi: The lightsaber is illuminated by 3 LEDs connected in parallel. The Top , Middle , and Bottom LEDs illuminate the slots in Darth Vader's chest control...

Introducing the Python library SimulRPi

Image
SimulRPi is a Python library that I wrote as part of my Darth-Vader-RPi  project. It partly fakes RPi.GPIO and simulates some I/O devices connected to a Raspberry Pi (RPi): push buttons by listening to pressed keyboard keys and LEDs by displaying blinking red dots in the terminal along with their GPIO pin numbers. The Python package pynput is used to monitor the keyboard for any pressed key. Thus, the SimulRPi library can be useful in the case that you want to try your  RPi.GPIO -based script by running it on your computer when no RPi is available at the moment. Example: terminal output Simulating LEDs on an RPi via a terminal Each dot represents a blinking LED connected to an RPi and the number between brackets is the associated GPIO channel number. Here the LED on channel 22 toggles between on and off when a key is pressed. Dependencies Platforms:  Linux, macOS Python:  3.5, 3.6, 3.7, 3.8  pynput >=1.6.8: for monitoring the keyboard for any pressed key...

Deactivate conda's base environment on startup

Image
When opening a terminal session, conda activates the base environment by default. If you want to prevent this default behaviour, you have three ways: Trick #1  :  Set the auto_activate_base parameter to false Trick #2  : Add conda deactivate in your bash configuration file Trick #3  :  Comment out some part of the conda initialisation code block in your bash configuration file NOTES: I'm working with  conda version 4.7.5 and  miniconda3 (it should also work with anaconda ). These tricks also worked with  conda version 4.6.14 After installing conda 4.7, conda added this block of code in my ~/.bash_profile : This is the block of code that we will modify in the following tricks Trick #1: set auto_activate_base  to false Per conda's instructions, "if you'd prefer that conda's base environment not be activated on startup, set the auto_activate_base parameter to false". Thus, enter the following command in a terminal: c...

Conda is broken after update: No module named 'conda_package_handling'

After updating my conda version 4.7.5 with conda update conda , conda is now broken. I get the following error message when doing conda info : ModuleNotFoundError: No module named 'conda_package_handling' NOTES: I'm working with  conda version 4.7.5  and  miniconda3 After trying to reproduce this bug, I am now getting the following error message when doing conda info : OSError: dlopen ( /Users/../lib/libarchive.dylib, 6 ) : Library not loaded: @rpath/libxml2.2.dylib EDIT [2019-07-29] :  I removed the temporary solution which consisted in downgrading your conda version since I found a complete solution (from a GitHub user) that allows you to work with the latest conda version 4.7.10 and Python 3.7.3 . See the solution below. Solution: re-install conda completely WARNING: the following solution involves the copying and deletion of the miniconda3 folder. Therefore, be very careful when handling the shell commands. I am not responsible for any data...

NLTK: Text.collocations() returns ValueError

Image
Book cover from  amazon.co.uk I was trying the collocations examples from  Chapter 1 , section 3.3 Collocations and Bigrams , of the book NLP with Python and I got the following ValueError The solution came from this NLTK’s issue on their GitHub  : Open  .../nltk/text.py    with your favorite editor NOTE: in my case the file was in ~/miniconda3/envs/nlp_py37/lib/python3.7/site-packages/nltk/text.py Change lines 440 and 441 from .../nltk/text.py    with the following line: print (tokenwrap( self . collocation_list(num, window_size), separator = "; " )) Now the collocations examples are working: text4 . collocations(num = 21 ) text8 . collocations() Output: NOTE: you can play with the argument num which refers to the maximum number of collocations to print.

Data analysis of developer job posts from Stack Overflow

Image
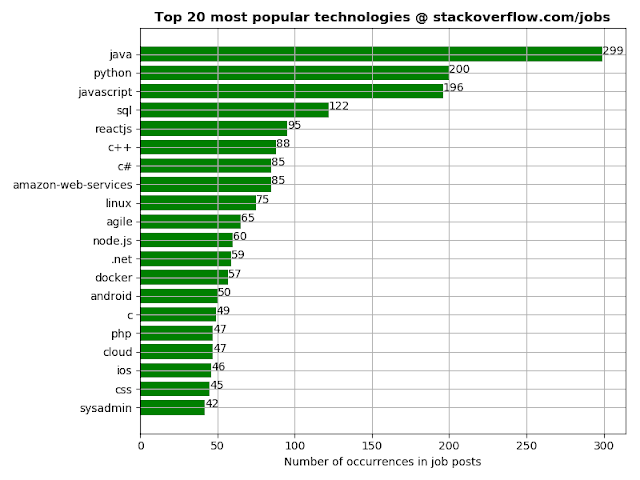
I did some data analysis on developer job posts from Stack Overflow with the aim of coming up with interesting insights about different aspects of job posts such as what are the most popular technologies, or the locations of job posts around the world as visualized on a map. After much data processing, I finally got the graphs I was looking for. I will show the most interesting graphs since there are too many to choose from and if you want to see the complete set of graphs, go to my personal website ; you will also find there explanations about how I managed to produce the data necessary to generate the graphs. The project is implemented in Python3 and makes use of a bunch of modules (e.g. BeautifulSoup4, matplotlib, plotly) for building the whole pipeline of generating the maps, graphs and reports. Contents 1. Sources of data and some initial stats 2. Bar chart: popularity of technologies based on number of occurrences in job posts 3. World map of job posts 4. Interactiv...

Save HTML as a single file

I wanted to save some HTML pages as single files that could be read by Chrome and Firefox. I found out that you could do it in Chrome without any extension by enabling the experimental flag Save Page as MHTML . This experimental feature can be found by typing chrome://flags/#save-page-as-mhtml   in the search bar. However, Chrome warns you to be careful with playing with these options: ... you could lose browser data, or compromise your security or privacy. Once you enable this option, you must restart Chrome, and thereafter the files can be saved in the compressed format MHTML, " a single text file containing HTML and all sub-resources ". However, these MHTML files can be read by Chrome, but not by Firefox. Thus I searched for other tools that can generate HTML single files which can be read by both Chrome and Firefox, and these are the two extensions I tried that can accomplish this feat: SingleFile : Install for  Chrome  and Firefox Save Page WE : Install for...